The 100 KB (one hundred kilobytes) file size ceiling is one of the most common — and most frustrating — constraints on the web. Government visa and passport portals, public civil service registration systems, job applicant tracking software, and email attachment gateways frequently enforce a strict 100 KB ceiling per uploaded photo. Faced with this barrier, everyday users often resort to crude online compression tools that butcher visual fidelity, reducing faces and identification documents into pixelated, unreadable JPEG block artifacts.
Compressing a photograph to fit under 100 KB with razor-sharp clarity is neither matter of luck nor sorcery: it is an exercise in optical physics and digital sampling engineering. In this comprehensive technical guide, we break down the mathematical interplay between pixel geometry, high-frequency spatial noise, and DCT quantization tables, demonstrating how to hit your target file size ceiling cleanly using the Compress Photo tool on PhotoEditor.sbs, running 100% locally in your browser with absolute data privacy.
1. The Mathematics of File Weight: What Actually Takes Up Bytes?
To compress an image file with surgical precision, one must understand how digital bytes accumulate across an image matrix. The final size of a compressed photo container (such as JPEG or WebP) is the direct product of three multiplicative factors:
- Total Pixel Volume (Width × Height): A photograph captured on a smartphone or mirrorless camera at 4000 × 3000 pixels contains 12 million individual sample points (12 megapixels). Forcing 12 million pixels into a 100 KB container demands a punishing compression ratio of 120:1, destroying fine details. Downsampling resolution to 1200 × 900 pixels slashes pixel count by 91%, making the 100 KB budget easily achievable at pristine visual fidelity.
- Entropy Complexity (Spatial Frequencies): An image containing smooth, uniform sky gradients compresses to 40 KB effortlessly because contiguous blocks share near-identical numerical values. Conversely, a photograph of dense tree canopies or textured tweed fabric possesses high mathematical entropy, requiring substantially more bytes to record rapid frequency fluctuations.
- Quantization Divisor Scaling: The quality factor (e.g., 80%) scales the quantization divisors applied across the Discrete Cosine Transform (DCT) matrix, rounding low-energy high-frequency coefficients to zero prior to entropy coding.
2. Geometric Resolution vs. Quality Factor: Where to Trim
The single most destructive technical mistake made when compressing for a 100 KB ceiling is leaving the image at its native camera resolution (4000 to 6000 pixels) while cranking the quality slider down to 20% or 30%. The resulting image suffers severe ringing artifacts, mosquito noise along edges, and coarse 8×8 pixel blocking.
The correct professional methodology reverses this sequence: downsample resolution first, compress second. On modern computer monitors, high-DPI smartphone displays, and print documents, an image measuring 1200 to 1600 pixels along its long edge provides tack-sharp resolution. Rescaling to this dimension allows each remaining pixel to be encoded with a generous quality factor (78% to 85%), preserving facial expressions, textual typography, and signature details without visible artifacts.
3. Noise Pre-Filtering: The Pro Trick to Reclaim 30% Space
An under-appreciated secret among photographers is the heavy byte penalty imposed by sensor noise on compression engines. Photos captured in dim indoor lighting or on small mobile sensors operate at elevated ISO levels (ISO 800, 1600, or higher), producing fine-grained random thermal chroma variations across pixels.
To a JPEG or WebP compression engine, thermal sensor noise appears as genuine, high-priority spatial frequency information. Coders often dedicate up to 35% of their total byte budget trying to encode chaotic grain instead of the core subject!
By applying a subtle noise reduction pass inside the Remove Noise tool on PhotoEditor.sbs before exporting, you smooth spurious pixel fluctuations while preserving anatomical contours. With surface noise calmed, the compressor achieves your 100 KB ceiling at a much higher visual quality setting.
4. How JPEG DCT Quantization Matrices Function
In standard JPEG encoding, an image is transformed from the spatial pixel domain into orthogonal frequency coordinates across 8×8 pixel blocks via the Discrete Cosine Transform (DCT). This operation converts spatial color values into 64 frequency coefficients: one DC coefficient sitting at the top-left corner (representing the average luminance across the entire block) and 63 AC coefficients (describing increasingly rapid frequency transitions across horizontal, vertical, and diagonal directions).
It is within the quantization phase that true lossy byte compression takes place. The encoder deploys two separate mathematical quantization tables:
- Luminance Quantization Table: Engineered with smaller divisors across low-frequency coefficients (faithfully retaining core subject shapes and gradual tonal transitions) and progressively larger divisors for high-frequency coefficients.
- Chrominance Quantization Table: Because human vision exhibits significantly reduced spatial acuity for high-frequency color variations, divisors across the Cb and Cr chroma channels are considerably more aggressive than those applied to luminance.
The mathematical operation applied to every individual frequency coefficient is expressed as:
Quantized_Coefficient = Round(DCT_Coefficient / (Q_Table[u, v] × Quality_Scale))When divisors are scaled up (lower quality numbers), the vast majority of mid- and high-frequency coefficients collapse to zero after rounding. Huffman entropy coding packs these long contiguous runs of zeroes into ultra-compact bitstreams using zig-zag Run-Length Encoding (RLE).
Consequently, file size reduction follows an exponential decay curve: lowering quality from 100% to 90% cuts file size by half; dropping from 90% to 80% saves an additional 35%; but dropping from 50% down to 30% offers marginal byte savings while inflicting catastrophic visual distortion, introducing visible block boundaries and edge blurring.
5. Step-by-Step Workflow: Hitting 100 KB with Crisp Clarity
In PhotoEditor.sbs, dialing in a high-fidelity image below 100 KB takes less than sixty seconds:
Step 1: Compositional Cropping
If your photo is destined for a passport, ID card, or professional profile, use the Crop Photo tool to eliminate dead margins. Tightening framing reduces the pixel area requiring compression.
Step 2: Proportional Resampling
Navigate to the Resize Photo panel and set the long edge to 1200 pixels (or the exact dimension specified by your portal application rules, typically between 600 and 1024 pixels). The editor maintains proportional aspect ratios automatically.
Step 3: Quality Tuning in the Compression Panel
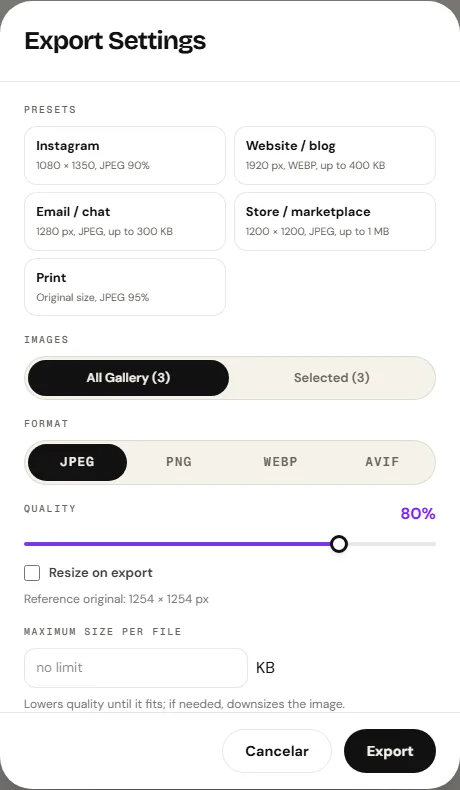
Open the Compress Photo panel. The system displays real-time estimates of the final file size as you adjust the quality slider. Set the slider between 78% and 84% until the output readout shows 85 to 95 KB, providing a safe buffer below your 100 KB limit.
Step 4: Direct Client-Side Download
Click Download Photo. The final JPEG is assembled in local browser memory and downloaded directly to your device without third-party server intermediaries.
6. Comparative Strategy Table Across Photo Categories
The table below outlines optimal configurations to achieve sub-100 KB file sizes without blur, categorized by output purpose:
| Photo Type & Delivery Purpose | Recommended Dimensions | Format & Quality Factor | Typical Resulting File Size |
|---|---|---|---|
| ID & Passport Headshot (35x45mm / 2x2 in) | 600 × 800 pixels (or 600 × 600 px) | JPEG with 85% to 88% quality | 45 to 70 KB (comfortably below 100 KB with tack-sharp facial features) |
| E-Commerce Product Listing | 1200 × 1200 pixels (1:1 square) | JPEG at 80% or WebP (when supported) | 80 to 98 KB (pristine pure white backgrounds without grain) |
| Blog & Editorial Hero Banner | 1400 × 788 pixels (16:9 ratio) | WebP (when supported) at 78% | 65 to 90 KB (rapid loading for Core Web Vitals compliance) |
| Scanned Certificate or Document | 1200 × 1600 pixels (A4 portrait) | JPEG at 75% with boosted contrast | 85 to 100 KB (clear alphanumeric characters and legible signatures) |
7. Security for Sensitive Documents: Client-Side Isolation
Most photos requiring 100 KB limits involve highly sensitive personal records: national ID cards, driver's licenses, passports, utility bills, and financial statements. Using cloud-based compression websites exposes these sensitive documents to third-party server databases, risking data harvesting and identity theft.
With PhotoEditor.sbs, data security is enforced by architecture. Image compression executes via the browser Canvas API and toDataURL() directly in local device RAM. Your private documents are never uploaded to remote servers, maintaining strict alignment with GDPR and LGPD data protection guidelines.
Compress Photo to 100 KB Now
Compress Photo to 100 KB Now8. Frequently Asked Questions
Frequently asked questions
Why did my photo turn blurry when I tried reducing it to 100 KB?
Blurriness occurs when you keep the camera's original resolution (such as 4000 × 3000 pixels) and drop the quality slider below 40%. The correct solution is downsampling dimensions to roughly 1200 pixels along the long edge while keeping quality between 78% and 85%.
Does PhotoEditor.sbs guarantee that every file will weigh exactly 100 KB?
Final file size depends on image visual entropy (textured landscapes require more bytes than clean portrait backgrounds). The editor provides a live byte readout so you can dial in 90 to 98 KB with complete precision.
Which format is more widely accepted for passport portals: JPEG or WebP?
Most government visa portals and legacy job application forms mandate JPEG (.jpg). Choose JPEG in the export modal to ensure universal acceptance without rejection errors.
Does compressing an image to 100 KB strip GPS and EXIF camera tags?
Yes. The browser Canvas re-rendering pipeline automatically creates a clean pixel raster, discarding embedded GPS geolocation coordinates and camera serial numbers to protect personal privacy.
Can I compress multiple photos below 100 KB simultaneously?
Yes. Open the Batch Photo Editing tool on PhotoEditor.sbs to specify a maximum KB size ceiling and apply compression across dozens of photos at once, downloading an organized ZIP package.
Does pre-filtering noise really reduce final file size?
Yes. High-ISO sensor noise registers as high-frequency entropy data in compression matrices. Smoothing noise before compression can reduce final byte weight by up to 30% without softening genuine subject edges.
Does PhotoEditor.sbs charge any fees for high-resolution photo compression?
No. The service is 100% free and open for personal and professional use, with no paid paywalls, no watermarks, and no mandatory registrations.
How do I confirm the exact file size after downloading my compressed photo?
On Windows, right-click the saved file and choose 'Properties'. On Mac or smartphones, inspect file information in Finder or your photo gallery details to verify size in kilobytes.