HSL adjustment (Hue, Saturation, Lightness) represents one of the most sophisticated tools in digital colorimetry and photographic post-production. While global temperature and saturation sliders indiscriminately affect every photon mapped across the pixel matrix, selective HSL isolation allows photographers to manipulate specific spectral bands with surgical precision. You can deepen the cobalt blue of a sunny sky without tinting portrait skin tones, restore the chlorophyll richness of a forest canopy without turning the grass neon green, or neutralize spurious color casts while preserving the neutral balance of the scene.
In this comprehensive technical and practical guide, we explore the physical and mathematical foundations of the HSL cylindrical model, the physiology of human visual perception regarding memory colors, the vectorscope skin tone line, analytical recipes for key shooting scenarios, and how to apply these principles directly in your browser using the HSL Color panel on PhotoEditor.sbs, completely client-side without server file uploads and with total data privacy.
1. Physics and Mathematics of the HSL Cylindrical Model
Digital image sensors (CMOS and CCD) operate in a purely linear or gamma-corrected additive Cartesian space: the RGB model (Red, Green, and Blue). Each photodiode measures the intensity of light filtered through the Bayer mosaic. However, the human brain does not interpret the world by breaking down scenes into numerical percentages of RGB channels. Human vision — mediated by foveal cones and retinal processing — decodes visual stimuli through three fundamental perceptual properties:
- Hue (H): The chromatic property described as a trigonometric angle between 0° and 360° along Newton and Munsell's color wheel. Pure red is conventionally located at 0° (and 360°), yellow at 60°, green at 120°, cyan at 180°, blue at 240°, and magenta at 300°. Mathematically, changing hue rotates the angular vector without modifying radial distance from the center.
- Saturation (S): Spectral purity or radial distance relative to the central achromatic neutral axis. A saturation value of 0% sits at the center of the cylinder, representing a monochromatic gray tone with zero spectral dominance. As the vector moves outward toward 100%, the color reaches its maximum physical chromaticity within the working color space (typically sRGB).
- Lightness (L): The vertical coordinate ranging from 0% (absolute black, complete absence of radiant energy) to 100% (pure specular white, full subpixel saturation). At 50% lightness sit the pure saturated colors.
The mathematical conversion between normalized RGB coordinates in the [0, 1] range and the HSL cylinder is expressed analytically by identifying extreme channel values: M = max(R, G, B) and m = min(R, G, B), with the contrast span Δ = M - m. Lightness is calculated as the arithmetic mean of the extremes:
L = (M + m) / 2Saturation is determined relative to distance from the center of the tonal scale:
S = 0, if Δ = 0 S = Δ / (1 - |2L - 1|), if Δ > 0While hue is calculated segmentally by the dominant channel:
H = 60° × (((G - B) / Δ) mod 6), if M = R H = 60° × (((B - R) / Δ) + 2), if M = G H = 60° × (((R - G) / Δ) + 4), if M = BThis elegant formulation reveals why HSL is incomparably more intuitive for color adjustments than raw RGB channel curve manipulations: it cleanly decouples chromatic identity (H) from perceptual pigment intensity (S) and incident luminous energy (L).
2. The 8 Spectral Ranges and Chromatic Separation
To provide surgical control without the complexity of manual vector masks, the editor divides the continuous 360° circle into eight discrete spectral sectors, each equipped with smooth feathering curves at the boundaries to prevent abrupt transitions and tone clipping:
1. Reds (345° to 15°)
Governs lips, cutaneous flush, scarlet fabrics, brickwork, and sunset embers on the horizon. Slight clockwise hue shifts introduce orange tones, while counter-clockwise shifts yield crimson and magenta hues.
2. Oranges (15° to 45°)
The most critical channel in portrait photography: where melanin concentrations reside across almost all human skin tones, as well as natural woodwork, golden sunsets, and autumn leaves.
3. Yellows (45° to 75°)
Governs golden hour highlights, beach sand, and bright green vegetation. Most sunlit green foliage actually carries over 60% of its chromatic energy mapped into this yellow sector.
4. Greens (75° to 165°)
Contains deep chlorophyll pigments from mature leaves, moss, and conifers. Shifting hue toward cyan creates a cool Nordic atmosphere; shifting toward yellow warms tropical lawns.
5. Cyans / Aqua (165° to 195°)
Found in shallow sea waters, swimming pool reflections, and low atmospheric horizon haze on clear days. Indispensable for cinematic Orange & Teal color grades.
6. Blues (195° to 255°)
Controls Rayleigh scattering across the sky dome, deep ocean surfaces, and open-sky shadow areas. Lowering its luminance adds dramatic density to daytime skies.
7. Purples (255° to 285°)
Late twilight skies, wildflower meadows, and neon illumination shadows. Frequently harbors axial chromatic aberrations from fast prime lenses opened at maximum aperture.
8. Magentas (285° to 345°)
The transition between blue and red, common in dusk cloud reflections and synthetic clothing. Invaluable for neutralizing optical purple fringing around high-contrast edges.
3. Memory Colors and the Skin Tone Line
Visual neuroscience demonstrates that the human brain does not evaluate all colors with equal leeway. Objects without fixed physical benchmarks — such as dress fabrics, abstract paintings, or car paint — enjoy wide aesthetic tolerance. In contrast, so-called memory colors have deeply anchored biological templates in our visual cortex:
- The Skin Tone Line (Melanin): Regardless of ethnic heritage (Caucasian, Asian, African, Indigenous, or mixed), blood hemoglobin combined with eumelanin and pheomelanin concentrates human skin tones along a remarkably narrow angular band: between 15° and 25° in hue (Orange and Red-Orange sectors). The difference between light and dark skin tones lies almost entirely in Lightness (L) and Saturation (S), rarely in Hue deviation beyond ±5°. Angular deviations of just 6° clockwise make subjects appear jaundiced or sickly yellow, while 6° counter-clockwise introduces unnatural sunburn flush.
- Daytime Sky Blue: Our memory expects a smooth gradient from deep cobalt blue down to cyan at the horizon. Skies with hues pushed toward purple or green immediately appear alien or improperly calibrated.
- Living Foliage: Pure chlorophyll reflects light wavelengths around 550 nm (yellowish green). Foliage with excessive green saturation looks like synthetic plastic, requiring a delicate balance between the Green and Yellow channels.
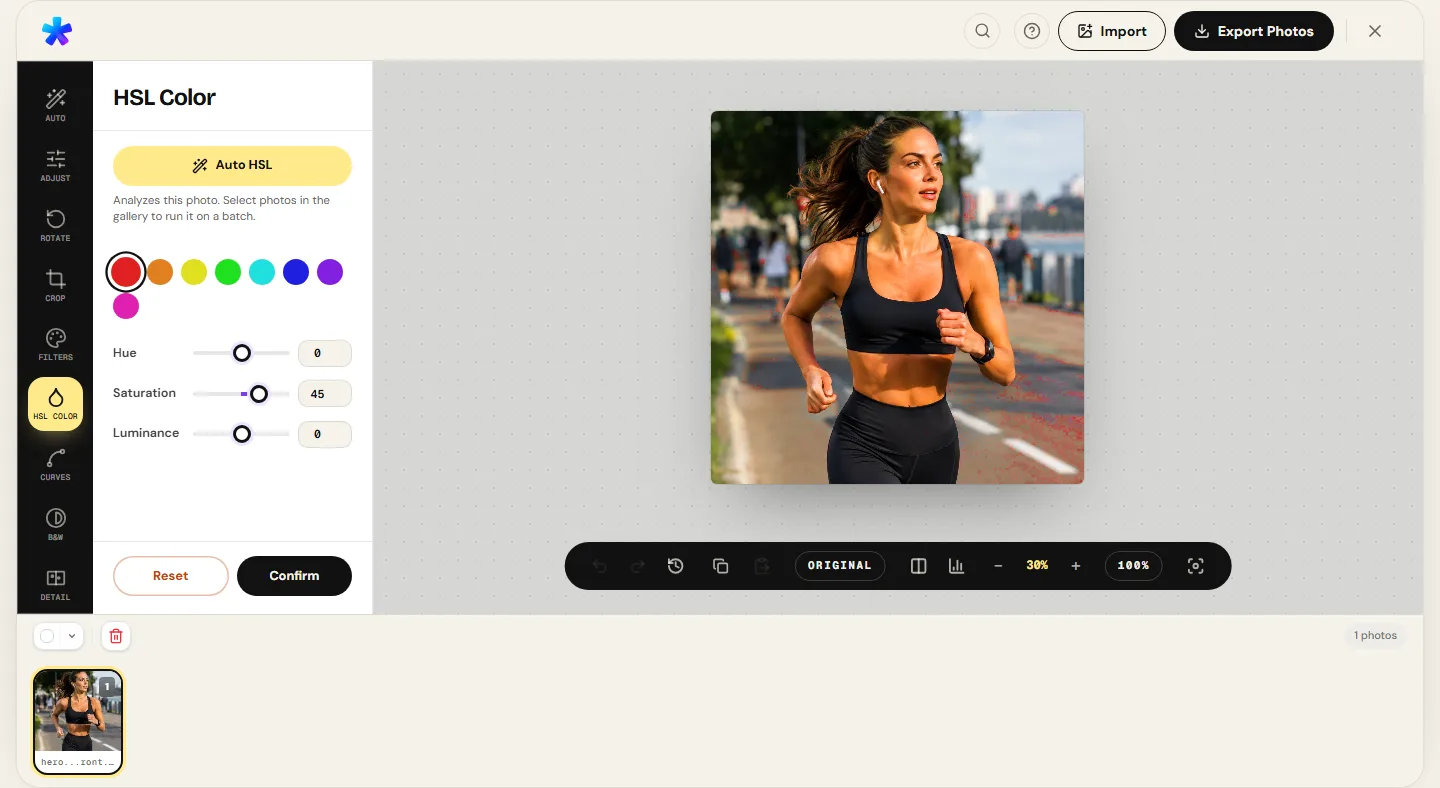
4. Step-by-Step Diagnostic Workflow in the Editor
HSL adjustments must follow a disciplined methodology to prevent adjustments in one band from destabilizing global photographic color harmonies. We recommend this five-step professional workflow:
Step 1: Prior Tonal Correction
Before opening the HSL panel, ensure base exposure, contrast, and overall white balance are dialed in. HSL operates on mapped RGB values; if your white point is off (for instance, an overly warm incandescent lamp cast), the entire angular hue calculation will be shifted.
Step 2: Target Band Identification
Determine exactly which element in the image requires intervention. Remember that most natural elements span two adjacent bands: daytime skies involve Cyan and Blue; living foliage spans Yellow and Green; human skin resides in Orange and Red.
Step 3: Lightness Modulation
Contrary to the common habit of boosting saturation first, lightness is usually the primary lever to pull. To give dramatic depth to skies, reducing Blue Lightness by -20 to -35 creates a striking polarizing filter effect without oversaturating midtone details.
Step 4: Saturation Fine-Tuning
Adjust pigment intensity. Avoid extreme values (+60 or higher) that clip against the boundaries of the sRGB gamut. For flushed or irritated skin, a subtle reduction in Red Saturation (-10 to -15) evens out complexion tones far more naturally than skin blur filters.
Step 5: Hue Refinement
Use hue to correct undesirable color shifts. Moving Green Hue slightly clockwise (+15) transforms dry, yellowish grass into lush emerald turf while preserving organic realism.
5. The Auto HSL Algorithm in the Browser
In PhotoEditor.sbs, clicking Auto HSL triggers a deterministic statistical analysis over the pixel matrix unpacked from HTML5 canvas ImageData. The browser processing pipeline executes rigorous analytical steps:
- Adaptive Stride Sampling: The algorithm downsamples the image along a regular grid to maintain processing latency within fractions of a millisecond, even on 24 to 48-megapixel camera files.
- Eight-Bin Spectral Binning: Each sampled pixel is converted to HSL and binned into its corresponding spectral sector by hue angle. Achromatic pixels with saturation under 12% or extreme lightness (< 8% or > 92%) are excluded from calculations to prevent bias from clipped shadows or blown highlights.
- Weighted Mean and Deviation Assessment: The algorithm evaluates the mean saturation and lightness of each band against empirical statistical curves calibrated for natural photography. If the Blue channel displays high lightness with low relative saturation (typical of a washed-out sky), a negative luminance offset with modest saturation recovery is computed.
- Continuous TypedArray Execution: Resulting coefficients are applied through a one-dimensional look-up table (LUT) mapped onto a
Uint8ClampedArray, ensuring smooth 60 fps rendering in the browser without memory bottlenecks.
6. Comparative Practical Recipe Table
The following table compiles baseline parameters tested across classic editorial, landscape, and commercial photography scenarios. Use these numbers as calibrated starting points before visual fine-tuning:
| Shooting Scenario | Target HSL Channels | Recommended Setting | Visual Effect Achieved |
|---|---|---|---|
| Dramatic Deep Sky | Blue and Cyan | Blue: L -25, S +15 | Cyan: L -15, S +10 | Simulates a circular polarizing filter, boosting contrast against white clouds without introducing grain. |
| Skin Redness Correction | Red and Orange | Red: S -15, L +10 | Orange: H +5, S -5 | Calms facial redness, rosacea, and flush without dulling the subject's natural vitality and healthy glow. |
| Lush Forest and Lawn Foliage | Yellow and Green | Yellow: H +15, S -5 | Green: H +10, S +10, L -10 | Eliminates harsh yellow-green glare from bright sunlight, producing a deep, rich cinematic foliage tone. |
| Golden Sunset Warmth | Orange and Yellow | Orange: H -10, S +20, L -5 | Yellow: H -15, S +15 | Warms golden-hour highlights and shifts sun rays toward rich amber, enhancing thermal comfort in the scene. |
| Cinematic Teal & Orange Look | Orange and Cyan/Blue | Orange: S +15, L +5 | Blue: H -15, S +20, L -15 | Maximizes complementary chromatic contrast between warm skin tones and cool shadow environments. |
| E-Commerce Product Neutrality | Target Product Color | Target Channel: S +10 to +15, L balanced | Faithfully matches physical product catalog color samples without polluting pure white 255 backgrounds. |
7. Critical Artifacts: Avoiding Posterization and Noise
Because HSL operates differentially across color bands, aggressive slider positions can expose bit-depth limits in standard 8-bit JPEG files (which contain only 256 discrete levels per channel). Beware of four critical hazards and apply their remedies:
- Posterization and Sky Banding: Lowering Blue Lightness too aggressively (-50 or lower) on a pre-compressed JPEG stretches smooth gradations until they snap into visible concentric bands. Cap lightness reduction around -30 and gently increase saturation to compensate perceptually.
- Chroma Noise in Underexposed Shadows: In high-ISO captures (ISO 1600+), shadow regions often harbor thermal sensor noise. Boosting Lightness or Saturation in Purple and Magenta bands instantly reveals noisy blotches. Keep Purple and Magenta adjustments restrained.
- Edge Halos and Fringing: When foliage branches are silhouetted against a bright sky, transition edge pixels blend green and blue values. Shifting Green Hue drastically without adjusting Cyan and Blue creates an unnatural discolored fringe along branch silhouettes. Keep hue rotations within ±20 units.
- Over-Desaturation Creating Dead Grays: When attempting to mute an unwanted tint (like a yellow wall reflecting into a room), dropping saturation to -100 creates an artificial dead-gray patch that draws more negative attention than the original cast. Desaturate moderately (-25 to -45) and adjust lightness.
Open the HSL Color tool in PhotoEditor.sbs
Open the HSL Color tool in PhotoEditor.sbsFrequently asked questions
What is the difference between Global Saturation, Vibrance, and HSL?
Global Saturation multiplies all pixel intensities equally across the frame, risking blowing out already saturated highlights. Vibrance selectively boosts muted colors while protecting skin tones. HSL isolates eight separate color bands, allowing you to modify one color without affecting any other part of the image.
Why are HSL panel adjustments cleaner than adjusting White Balance?
White Balance shifts overall color temperature and tint across the entire frame simultaneously. Cooling white balance to make skies bluer casts a blue tint over faces, walls, and neutrals. HSL acts surgically only on specific blue wavelengths, leaving faces and neutral tones untouched.
How does HSL help balance skin tones in corporate portraits?
By targeting the Orange band: gently elevating lightness (+5 to +10) and softening saturation (-5) adds clarity and radiance. If there is localized facial redness (cheeks, nose), reducing Red Saturation (-15) calms flushed skin without desaturating lips.
What causes harsh banding lines when darkening a blue sky, and how do I fix it?
Banding occurs when 8-bit JPEG quantization steps are stretched too far in smooth tonal transitions. To avoid banding, limit Blue Lightness reductions to -25 and avoid pushing Saturation past +25. Pairing the adjustment with a slight Cyan Lightness decrease also smooths out the gradient.
Does PhotoEditor.sbs send my photos to a server during HSL editing?
No. All computations — including Auto HSL statistical sampling and TypedArray pixel processing — execute entirely in local browser RAM and GPU via the HTML5 Canvas API. No image data is ever uploaded to external servers.
How does the Auto HSL feature determine suggested corrections?
The algorithm samples color distribution across eight hue sectors, discards clipped shadow and highlight pixels, compares mean saturation and luminance against empirical photographic norms, and applies balanced offsets for skies, foliage, and warm tones.
What is the best HSL formula for reviving dull landscape grass and trees?
Balance Yellow and Green. Sunlit foliage reflects primarily yellow wavelengths. Shift Yellow Hue slightly toward green (+10 to +15) and drop saturation slightly (-5), then reduce Green Lightness (-10) with moderate saturation for a deep, natural look.
What file formats are available to save edited photos?
The editor exports photos in JPEG with adjustable compression or PNG for pristine clarity. For modern websites and blogs, WEBP export (when the browser supports it) delivers substantially smaller file sizes while preserving visual fidelity.