Converting a color photograph to black and white is one of the most timeless artistic choices in visual media. Monochrome strips away secondary color distractions, compelling the viewer to focus directly on structural foundations: line geometry, shadow volume, textural rhythm, and lighting drama. However, the most widespread beginner mistake is simply dialing the image's global saturation slider down to zero — a shortcut that almost always produces a flat, muddy, lifeless gray result.
Genuine fine-art black and white photography is born from calculated tonal separation between the original colors in a scene. During the analog film era, legendary masters like Ansel Adams and Sebastião Salgado relied on physical colored glass optical filters threaded onto the front of their lenses to dictate exactly how light or dark each individual spectral hue would render on the silver halide negative. In this comprehensive guide, we examine the physics of spectral conversion, the mathematics of color channel mixers, classic optical filter emulation (Red, Orange, Yellow, and Green), and how to sculpt gallery-grade monochrome conversions inside PhotoEditor.sbs's Black and White Photo tool, running 100% locally in your browser.
1. Monochrome Conversion Physics: Why Desaturation Fails
To grasp why naive desaturation fails, visualize a bright crimson red apple resting among dense forest green leaves. While red and green are complementary colors producing striking visual contrast in the human eye, both surfaces often reflect similar total luminous energy (very comparable perceived luminance). When you linearly strip saturation, both the bright red apple and deep green foliage collapse into the identical middle-gray tone — causing the subject to vanish into a flat, indistinguishable silhouette.
Fine-art monochrome editing requires a spectral channel mixer. A channel mixer empowers the photographer to answer foundational creative questions: should the red apple render as luminous, radiant porcelain white, or as dense, dramatic obsidian gray? Should the midday blue sky render as a pale washed-out haze, or as an ominous, high-contrast dark storm? Total compositional authority comes from assigning custom luminance weights to specific optical wavelengths of light.
2. Mathematical Luminance Formulas (BT.601 vs. BT.709)
Computer graphics standards have formalized mathematical equations to convert three-dimensional RGB coordinates into a single scalar luminance value Y:
- Legacy NTSC / ITU-R BT.601 Standard:
Y = 0.299 R + 0.587 G + 0.114 B. Formulated during the cathode-ray television era, heavily favoring the green spectrum over blue. - High-Definition ITU-R BT.709 Standard:
Y = 0.2126 R + 0.7152 G + 0.0722 B. Closely models the human retina's photopic spectral sensitivity curve across modern sRGB displays. - Classic Panchromatic Silver Halide Film: Traditional analog black-and-white emulsions featured heightened sensitivity to blue and ultraviolet wavelengths, resulting in luminous open skies and distinctive skin tone gradations.
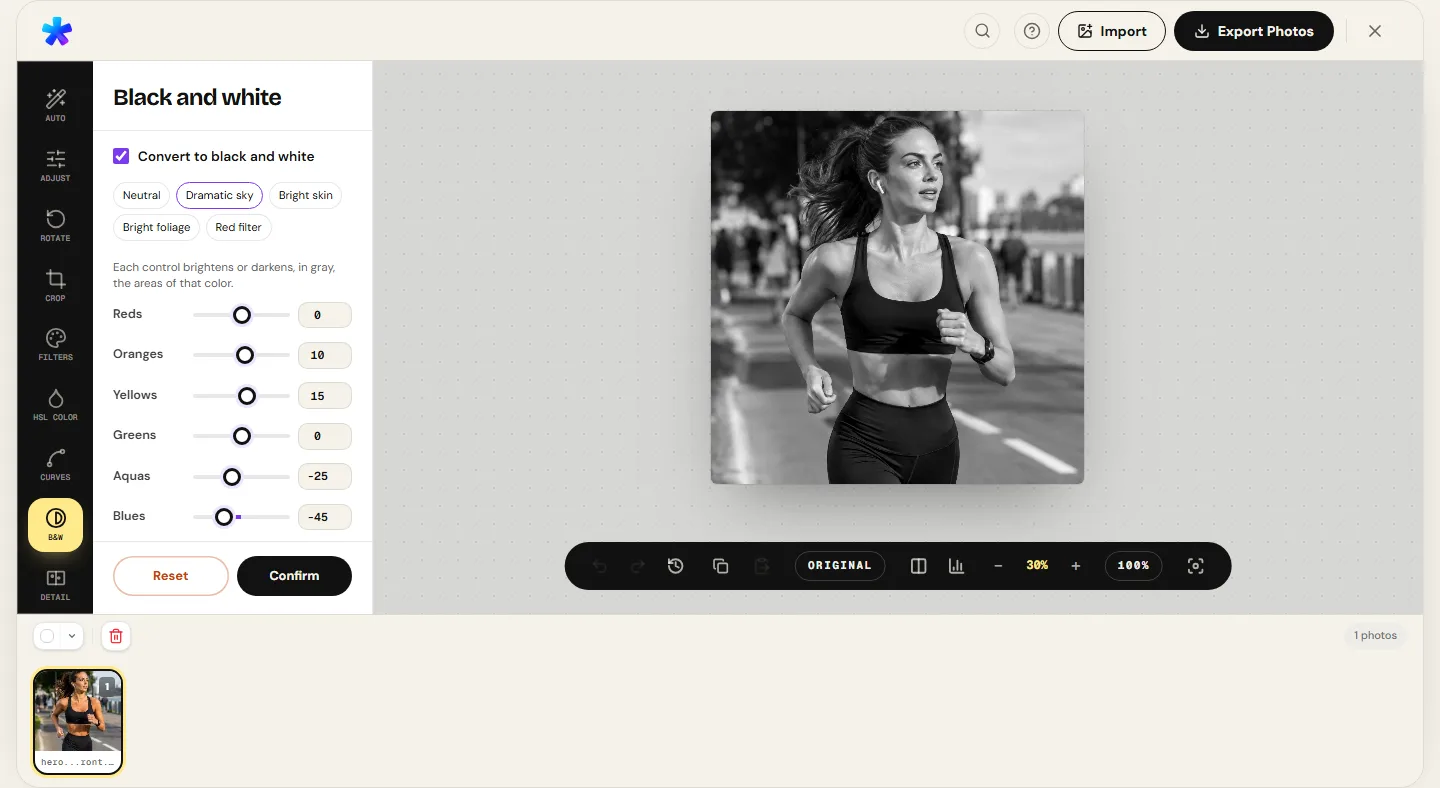
In PhotoEditor.sbs, the channel mixer liberates you from rigid broadcast video formulas, giving you direct control over red, orange, yellow, green, and blue spectral bands to generate tonal separation impossible with generic phone filters.
3. Physics of Classic Analog Glass Optical Filters
In analog film darkrooms, the fundamental rule governing colored glass filters was straightforward: a color filter lightens its own color and darkens its complementary opposite color on the color wheel. PhotoEditor.sbs mathematically simulates this optical physics directly within the browser canvas pipeline:
Red Filter (Wratten 25A Emulation)
The most dramatic monochrome filter available. By absorbing blue and cyan wavelengths caused by atmospheric Rayleigh scattering, it renders clear daytime skies as near-black, forcing crisp white clouds to stand out in sculpted relief. In portraiture, it softens skin blemishes and lightens lips.
Orange Filter (Wratten G16 Emulation)
The ideal balance between red's aggression and yellow's subtlety. Moderately darkens blue skies, cuts through distant atmospheric haze, and smooths skin tones naturally, making it the premier choice for outdoor portraits and stone architecture.
Yellow Filter (Wratten K2 Emulation)
The quintessential landscape baseline filter. Gently darkens blue skies to bring out natural cloud definition while brightening foliage slightly. It mirrors natural human daytime eyesight more closely than any other filter.
Green Filter (Wratten X1 Emulation)
Essential for forest, botanical, and nature photography. Lightens chlorophyll pigments in lush foliage while darkening reddish earth tones and tree bark, establishing separation in dense wilderness scenes.
4. Applying Ansel Adams' Zone System to Digital Monochrome
Master photographer Ansel Adams formulated the acclaimed Zone System to systematically map the continuous spectrum of light into eleven discrete tonal increments (Zone 0 through Zone X):
- Zone 0: Pure digital black (sensor level 0), devoid of texture or detail.
- Zone III: Rich textured shadows (dark stained wood, heavy black fabric folds, shadowed vegetation).
- Zone V: Standard 18% reflectance neutral middle gray (tanned skin, illuminated green foliage, weathered stone).
- Zone VII: Textured highlights (fair skin in direct sunlight, textured snow in light shadow, bright dry sand).
- Zone X: Pure digital white (sensor level 255), direct specular light sources and raw solar glints on water.
A commanding monochrome image avoids clustering everything in mid-gray Zone V tones; instead, it establishes anchors in deep Zone III shadows and crisp Zone VII highlights, punctuated by deliberate pure black and pure white peaks.
5. Step-by-Step: Sculpting Monochrome in PhotoEditor.sbs
Follow these four straightforward steps to produce exhibition-quality black and white imagery in PhotoEditor.sbs:
Step 1: Open Your Color Image
Navigate to the Black and White Photo tool and load your high-resolution original picture.
Step 2: Choose a Spectral Filter Preset
Explore built-in optical filter presets: Dramatic Sky (red filter emulation) for sweeping landscapes, Soft Portrait (orange filter) for people, or Vivid Nature (green filter) for botanical scenes.
Step 3: Fine-Tune Channel Sliders
Adjust individual spectral channel sliders to lighten or darken specific components of your scene according to your artistic vision.
Step 4: Shape Dynamic Range with Tone Curves
To inject depth and punch, navigate to Curves and Levels and introduce a gentle S-curve to anchor blacks and illuminate highlight peaks.
6. Spectral Filter Response and Application Reference Table
The following table outlines the absorption characteristics and real-world photographic roles of each optical filter:
| Simulated Optical Filter | Blocked Light Wavelengths | Tones Brightened vs. Darkened | Ideal Photographic Scenarios |
|---|---|---|---|
| Red Filter (25A) | Blue and Green (< 580 nm) | Brightens reds and warm tones; deeply darkens blues and cyans. | Dramatic skies, stark architectural lines, high-contrast desert sand dunes. |
| Orange Filter (G16) | Blue and Cyan (< 550 nm) | Smooths skin tones; moderately suppresses sky brightness. | Environmental portraits, urban streetscapes, historical stone textures. |
| Yellow Filter (K2) | Blue and Violet (< 500 nm) | Subtly reins in excess ambient blue; creates natural balance. | Everyday street photography, open meadow landscapes, general documentary. |
| Green Filter (X1) | Red and Deep Blue | Lightens grass, tree canopies, and leaves; darkens reddish soil. | Botanical gardens, dense forests, woodland canopies, fine macro flora. |
7. Pairing S-Curves, Levels, and Black and White
Monochrome conversion achieves its full potential when paired with dynamic range sculpting. In PhotoEditor.sbs, all processing occurs non-destructively in client-side memory: channel mixer calculations flow seamlessly into the tone curve and levels engine.
After locking in your spectral filter weights, open the Adjust Photo tool to inspect your live histogram. Verify that the left foot gently brushes digital level 0 (ensuring rich, authoritative blacks) while highlight crests extend toward level 255. This expansive zonal distribution produces the rich depth characteristic of classic silver gelatin museum prints.
Convert Photo to Black and White Now
Convert Photo to Black and White Now8. Frequently Asked Questions
Frequently asked questions
What is the key difference between desaturating a photo and using a black and white mixer?
Simple desaturation applies identical fixed mathematical weights across all pixels, frequently causing different colors to turn into the exact same muddy gray. A channel mixer lets you control the brightness of each original hue independently, allowing you to darken blue skies while brightening green leaves.
How can I make the sky dark and dramatic in a black and white photo?
Select the Red Filter preset or manually drag down the Blue slider in the channel mixer. Because daytime blue skies are composed of Rayleigh scattered blue light, attenuating that wavelength turns the sky into deep charcoal, making white clouds stand out.
Why is a green optical filter recommended for forest photography?
Chlorophyll in tree leaves and grass reflects green wavelengths. A green filter brightens these pigments while simultaneously darkening red and brown bark or soil, creating distinct layers and tonal depth in dense woods.
Does PhotoEditor.sbs place watermarks on exported monochrome images?
No. PhotoEditor.sbs is completely free and never adds watermarks, stamps, or logos to any of your exported pictures.
Will my original color photograph be altered or overwritten during conversion?
No. All image processing inside PhotoEditor.sbs is strictly non-destructive and handled locally in your browser memory. Your original picture remains untouched on your disk.
How do I recreate the vintage aesthetic of analog silver-halide film?
Combine an Orange or Yellow filter in the Black and White tool, add a subtle S-curve in Curves and Levels, and apply procedural organic grain in the Vignette & Grain panel to emulate classic film halide texture.
Can I export high-resolution monochrome images for large gallery prints?
Yes. You can export in maximum-quality JPEG (95% to 100%) or uncompressed PNG, preserving full camera sensor resolution and fine textural fidelity for physical prints.
In what image formats can I receive my finished black and white photo?
PhotoEditor.sbs provides high-resolution JPEG and sharp PNG, alongside WebP when the browser supports the format.